![]()
Programs and Tools needed:
• Adobe Photoshop or Paint Shop Pro (Free) [55mb]
• Pluggin to edit .DDS files: Download DXT Tools [594kb]
• Program to extract mix files. Download XCC mixer [613kb]
Step 1: Assuming you have Photoshop or Paint Shop Pro, you will need to unzip the DXT Tools.zip, Look for the pluggin called "DDS.8BI" . You need to place that pluggin in your Photoshop or Paint Shop Pro pluggins folder. This will allow you to edit .DDS files with the program. Those of you using Photoshop, the pluggin goes in your "Formats" folder located inside your Pluggins folder.
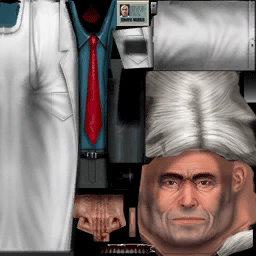
Step 2: Unzip the XCC Mixer.zip you downloaded. Run the .EXE program and it will automatically search and open all the mix files available for all your Westwood games you have loaded. Give this program time to find and extract everything. It may take a while. Once the program has extracted all the files, in your XCC window click on file in the upper left corner, scroll down to "Found", and then to Renegade. You'll see all the mix files. You'll find the vehicle and unit .dds files in those mix folders. Most of what you are looking for is in the Always.dat folder. Open that one up. Below is an example of what the .DDS skin file looks like. This one is Mobius. The name of the file is c_mobius.dds, Images below...
While your in the Always.dat folder, you can extract any file you want by right clicking on the file name, choose extract, and then send it to your desktop or create a folder on your desktop and place it in there so you can find it easily.
Step 3: Now we're ready to edit the .dds file. I use Photoshop, so I'll use that program as an example. Fire up Photoshop. Click on file, and then open and go to where you placed your .DDS file. If you placed the pluggin in the correct folder, Photoshop will be able to work with .DDS files. You'll get a small window prompt asking the following: Image has Mip Maps. Display them with the image? Select NO. Ok...once your .dds file is loaded on Photoshop, the rest is up to you to edit it as you want. You can place layers over the skin background, or just edit the skin background itself. You're only limited by your skills and imagination.
Step 4: Once you've finished your work, it's time to save it. Go to file, and then "Save As". Your going to save this as a .DDS file. You'll be getting a save options window display giving you a lot of choices. Set it up exactly as the image below
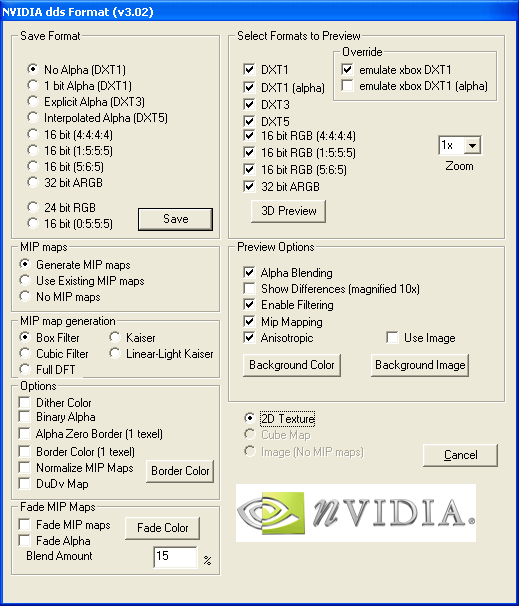
NOTE: Those of you who get a black looking skin in the game, it is most likely you didn't save the .dds file correctly. Make sure the other options below are selected. This example is for those of you using Photoshop.
Step 5: Place your finished skin on your Westwood/Renegade/data folder. Fire up your Renegade game. You can use the Multiplayer practice mode to see what your new skin looks like. If you've modified one of the vehicle skins, just purchase the one you modified and check it out.
Download the skin tutorial to your computer Here
This tutorial was originally made by CNC Den, edited by Me ( Smasher9a just encase you haven't already worked that out :P )